

The world of music is enormous. In that world, there are a lot of guitar variants. But the acoustic guitar is probably the most popular of them all. Most beginner musicians choose an acoustic guitar for their learning curve.
But like all other guitars, acoustic strings start to get a bit rusty over time. That can lead to finger burns, affect the sound, and probably break the string.
So, everyone should change the strings after playing the guitar for a certain amount of time. Because when you use the same acoustic or electric guitar strings for a long time, a buildup of dirt, sweat, dead skin, and oils found naturally in the fingers will affect its tone and intonation. The strings will grow dull, difficult to play, and likely to break as they age.
You should even consider changing the string even if your guitar has been idle for a long time.
Going to a local guitar store only to change a simple guitar string is just a waste of time and money. Especially when changing guitar strings is a very easy task that you can do on your own.
If you can’t restring your guitar then you should definitely learn it, especially when you’re a fellow musician. Learning how to restring an acoustic guitar, whether you’re a beginner or an expert, can be a useful skill.
For those who still go to a local store to change and those who are relatively new to the music world, now is the time to learn how to change strings on your guitar yourself. Because in this article we are going to show you how to easily change the strings of acoustic guitars.
We decided to divide the whole process into small steps, making it really easy for you to follow.
Preparing to Change Your Strings
Step 1: Find a Clean & Quite Place Location
If you’re restringing your guitar, make sure the place is not messy so you don’t lose anything. Keep in mind that this work requires the use of little parts, which you may lose during the procedure. It’s also essential that you work in a quiet peaceful environment so you can easily tune your guitar.
Step 2: Gather Your Tools
You will need Wire Cutters, Spray Cleaner, Headstock Stand, Lemon Oil, a Tuning machine, and finally 2 sets of new strings. You should have at least two sets of strings on hand in case one break or needs to be replaced.
Just so there’s no confusion, you can change the strings on your guitar without using any equipment.
However, to save time, I suggest using a string winder. You’ll need two cloths, one for the lemon oil and one to clean the fretboard while the strings are off.
Step 3: Keep Your Neck of the Guitar Balanced
Find a way to secure your guitar’s neck, such as a specific piece of equipment available at a guitar store. You can also use something soft and curved, such as a piece of polystyrene if you’re a beginner. This will help you to change your guitar strings.
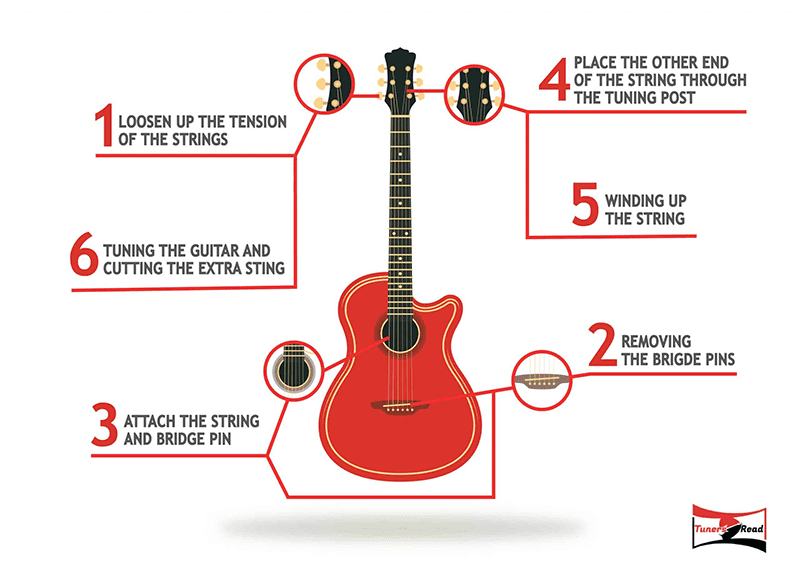
Changing Your Acoustic Guitar Strings
Step 1: Loosen the Old Strings
To loosen the tension on the string, you may use your string winder. If you don’t have one, no problem, you can just use your hands. But I’ll recommend you to use string winders to save your time.
You should turn the tuning peg (the keys on the pointy end of the guitar) in the opposite direction, that is you have to wind anti-clockwise with your left hands while keeping tension on the string with your right hand to loosen the bass strings – 6th (Low E string), 5th (A), and 4th (D). Turn the tuning key clockwise to loosen the treble strings, which are the 3rd (G), 2nd (B), and 1st (High E).
Step 2: Removing a String
After loosening all the strings, using wire cutters cut each string directly above the soundhole with your string cutters. Do not cut them at the end of the string.
You have to be careful in this step to cut the strings gently. If you remove strings roughly it will affect the tune of your guitar which can get very frustrating for a new guitarist.
Then use the built-in notch of the string-winder to remove the bridge pin. In case you have no idea about bridge pins, they’re situated on the ball end of the guitar and are connected to the end of the string. Bridge pins are specific for each string, so make sure to remember which one is for which string.
Pulling on the bridge pin at an angle is not a good idea! Most likely, they will snap as a result of this.
Once you remove the bridge pins, you may remove the strings. Just to be on the safe side, we’d recommend taking out two strings at a time instead of all of them altogether.
Optional Step: Cleaning the Guitar
You have an awesome chance to clean your fretboard now that the old strings are out of the way. Use .0000-gauge steel wool to clean the fretboard while covering the soundhole with a towel. You can rub the fretboard very roughly without harming it, but don’t let it touch the body!
If your fretboard is looking dry, this is a great time to apply a little fretboard conditioning oil or lemon oil. All you need to do is pour a small bit into a cloth and wipe over the wood. Then you are good to go.
Step 3: String Your Acoustic Guitar
It is time to again start the process of string change once the fretboard has been cleaned. Get a new set of strings and start by inserting the 6th string’s (Low E String) ball end, then the bridge pin. Pull up on the ball end while pushing the bridge pin down until it catches. To make sure the string is “locked” in place, gently pull it.
There shouldn’t be any problem identifying the type of string as there are markers at the end of the string.
Sometimes, bridge pins can pop up from their place. Don’t worry about that. Just gently push it towards the ball end and keep going.
Carry on with the process for the rest of the strings and keep winding until all the strings are done.
Step 4: Insert String inside the Tuning Post
Now, tighten the strings by pushing them through the tuning post about 3 inches or one and a half-machine heads. Then pull the strings towards the bridge plate. Cut the string about 2 inches away from the corresponding machine head so that you may poke it through the shaft of the machine head.
Step 5: Tighten the Strings
Pull the string tight or use the string winder on the proper tuning key to tighten the string, but don’t worry about tuning now. Start winding the strings with the string winder and make sure your winding direction is correct.
Simply tighten each string to check that it is in the right places. Make sure the strings are firm and properly tightened all the way from the tuning post to the ball end.
Normally, strings are tightened in the following order: 5A, 4D, 3G, 2B, 1E. Stretch your strings to make sure they’re correctly set.
Step 6: Cut Any Excess String
Loose wire can be harmful and make it hard to play your guitar. To make sure easy hand mobility, cut every excess string using wire cutters. If you do not cut the strings that are excess, you will likely face tuning issues.
Step 7: Get Your Acoustic Guitar Tuned
With a tuning machine, you can tune your guitar strings up to the correct pitch. But if you’re a beginner or having difficulties using the tuning machine, you can just go to a local shop and they tune it for you.
Now you’re ready to play your guitar with completely new strings!
Commonly Asked Questions
When do You Need to Restring Your Guitar?
Well, when a string or two breaks! Obviously, you can’t play your guitar with a broken string.
Jokes apart, after playing electric and acoustic guitars with the same strings for a long time, the strings will feel stiff and dirty. Also, the strings will be discolored. Moreover, the strings won’t stay tuned also the guitar’s tone will be dull. And that’s when you know a new string should be bought.
If you break one string, I recommend changing all of them to keep them consistent in tone! If you practice 30 minutes every day, you’ll probably want to change your strings every few months, even if you haven’t broken one yet. After changing a few times, you’ll begin to realize if the strings are starting to sound “dead” and you need to change them!
How Long will Unused Guitar Strings last?
If you keep your unopened packed strings in a cool, dry place with reasonable temperatures and humidity, they will last for many years, as they are made of nickel, copper, and steel, an iron alloy that is a long-lasting element.
Final Words
Changing strings on a regular basis is very important. If you don’t, your guitar will sound different and you may not enjoy playing it as much. And that’s the whole point, right? Enjoy playing and learning a great instrument.
The new string will improve your overall playing experience. The new strings have a brighter sound. They stay better tuned and are gentler on the fingers.
So, check if your guitar needs new strings or not. If it needs then get yourself new strings and try to change them yourself. We hope with our step-by-step guide, you’ll be able to change the strings of an acoustic guitar without breaking a sweat!
If you want to learn how to change the string of an electric guitar, check out here!
If you have any questions or having trouble with something, write it down below in the comment section and we’ll help as much as we can!