

Changing electric guitar strings on our own, yes that might sound a bit difficult to all of us. Especially when you have absolutely no clue how to do that.
I agree that changing electric guitar strings is a little tricky but once you get a hold of it, with practice it just becomes way easier.
Depending on usage and bridges, the strings on an electric guitar may need to be changed more regularly than the strings on a steel-string or traditional guitar. With time, whether you practice or your guitar has been left idle for months, like all other guitar strings, they tend to oxidize. This can cause finger sores, alter the tone of your guitar, and, in the worst-case scenario, break the string.
And not to mention, being able to restring guitar is an essential skill for guitar players of all skill levels- for armatures or the professionals. Hitting on guitar stores just to change strings might be very time-consuming and expensive.
So just to save you from the trouble, here is our step-by-step guide on ‘how to change electric guitar strings.’
We decided to break down the entire procedure into tiny phases to make it easier for you to follow.
Tools You Need to Change Electric Guitar Strings
- Fresh strings
- String cutters/ Pliers
- Tuner
- String winder
- Stumpy flat-headed screwdriver
How To Change Electric Guitar Strings Step By Step
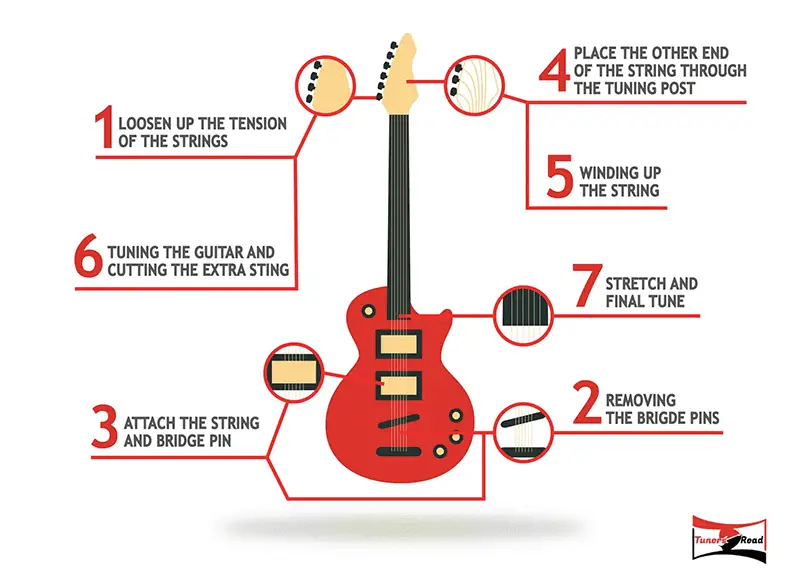
Step 1: Deciding How to Change Strings
It is still a debatable topic, how to properly change the strings. Is it better to change the strings one by one or should you just remove them all at once?
The answer is, the decision is completely yours, and of course, each approach offers its own set of advantages.
The neck is utilized to keep the string tension in balance with the truss rod tension, thus replacing the strings one at a time will retain the same level of tension. You’ll be able to clean and wash down the fretboard, which collects dirt, oil, and skin particles with time if you remove all the strings before restringing.
There is no right or wrong way to restring a guitar; simply choose the approach that works best for you.
Step 2: Removing the Old Strings
Finding Each String’s Path
If you’re new to this, first take another look at how the 6 string guitar or 12 string guitar should look when fully tuned up. Determine the route of each string. This is due to the fact that once the strings are removed, it’s quite simple to become confused about what belongs where.
As some electric guitars have unique features that include winding patterns and specific holes near the strings. So, you want to keep this under lock and key.
Or you may snap a photo of your guitar model or locate one online for reference.
Loosen the Old Strings by Down-Tuning
First, you need to turn the tuning machine or guitar tuning peg to loosen each string just enough to unwind and take it out by hand.
If the string sounds deeper when plucked, you’re loosening it. When you can cut your strings, this approach gradually relieves stress and, in the worst-case scenario, allows you to reuse an old string if one breaks while restringing.
Once loose, you can unwind the string of the guitar tuning peg and free it from the neck of the guitar.
Removing the Strings from the Bridge
Then you need to simply take the strings out of the rear of the guitar’s body on a standard bridge, such as a Fender Strat or any other string-through guitar.
To make it easier, slowly press the strings through, allowing for some slack and easy gripping. Slowly draw the string through the guitar by the little, donut-shaped metal end.
As most guitars are strung in a simple, straightforward manner, so just follow the string through the guitar to remove it. Avoid yanking the strings out to protect your precious guitar.
However, if your guitar has a wrap-around bridge, all you need to do is, pull the strings out of the underside of the bridge.
Cleaning the Unstrung Guitar
Well, in my opinion, cleaning the stringless guitar is the most satisfying part of changing guitar strings.
Do clean off all of the dust, filth, and dirt from your guitar’s neck using a lint-free cloth. This will improve the appearance of the instrument, preserve the new strings, and make the guitar feel a bit quicker.
Though it’s not mandatory you can purchase a bottle of fret-cleaner from the music store for a more thorough cleaning.
Step 3: Restringing the Guitar
Finding the Correct Strings for Your Guitar
It’s better to obtain “normal weight” or “light” strings for your electric guitar.
While some guitarists utilize larger gauges or unusual string configurations, you can’t just pick up a set of strings if your guitar isn’t built for it. Strings that are excessively heavy for your guitar might warp or bend the neck if not adjusted properly.
So, I will suggest you to stick to regular guitar string sizes until you learn more about your instrument.
As a rule of thumb, I prefer high E in a “.008-.0011” thickness. This applies to extra lite, lite, and medium strings. A drop D might require heavier and stronger ones.
Do not forget to google or ask around to do your own research before purchasing the perfect strings for your guitar.
Laying The Guitar on A Flat, Soft, Comfortable Surface
You should allow yourself plenty of areas to work by placing the guitar on a table and adjusting it comfortably.
To avoid any sort of scuffing or scratching, you can throw a towel or blanket below. To make tuning simpler, some people like to rest their heads off the edge.
Turning The Hole of The Tuning Post
Make sure the hole of the tuning post is facing you directly.
That means it will be pointing away from the string, making it parallel to one of the frets. To ensure you’ve got it right, try imagining holding it up against yourself. In this position, the hole will ideally be pointing up.
Threading Your First String Through the Bridge and Into the Tuning Peg
Begin by threading the first one through the end where you extracted the old ones. Allow it to fall into the tuning peg as you work your way around the inside of the instrument.
Like most players, I prefer to begin with the heaviest string, which is the top E, sometimes known as the “sixth string.” There is no hard and fast rule, but you should reinsert the strings in the same sequence you removed them. This simplifies things considerably.
You now move it in the opposite direction that the prior ones came out. Run it through the tuning pegs and effortlessly remove it from the instrument.
Remember to leave some space. I leave around two to three inches of slack string to allow for tightening.
The tuning pegs aren’t labeled, so simply reinstall the strings in the same sequence you removed them. The first peg on most electric guitars is for the top string, and each one farther towards the tip of the head is for a string lower down.
Making An “S” With the String
Grasp the thread at both ends of the peg and compress it into an “S.”
Here’s a hint: if you overthink things, you’ll probably get it wrong.
Instead, I just hold both sides and spin my hands clockwise, crimping them at the tuning post. This should result in a beautiful “S” shape, but not one that’s too flawless. You don’t want to stretch the string too much.
To simply put, your right hand should be coming towards your body, away from the guitar. And your left hand should be pushing up, in towards the other tuning pegs.
Wrapping One End of the String Around the Other
You need to pull the end of the string under the opposite side of the string (the side being fed into the tuning post).
Bring the end of the string back over the top and draw it taut, tugging towards the very tip of the instrument. You’re effectively making a loop with the string’s end around the remainder of the string.
Right where the string meets the tuning peg, you should have a short-coiled portion of string.
Holding Down the String and Tighten
Now, it’s time to tighten the strings.
Make sure to place your index finger 1-2″ before the string touches the tuning peg. You don’t want to pin it down, just keep it in place.
Then carefully spin your tuner counter-clockwise. Check that your string is wrapping uniformly around the peg.
As you turn the tuner, your string should wrap itself around it uniformly.
Allow the tuner to direct you to the proper level of tension.
It’s preferable to be too loose than too tight, as overtightening will cause the string to snap.
Repeating the Process for Rest of the Strings
Once you’re done with the first one, continue the process for the other strings, working your way through the packet. Remember to wipe the fretboard after removing a string, to allow some slack in the string before tightening, and to crimp the string before beginning to spin.
If your guitar has a 3×3 head, keep in mind that the lowest set of tuning pegs must be rotated in reverse. Simply repeat the preceding procedures, substituting left for right and up for down.
Step 4: Tuning & Stretching
Tuning-Up your Guitar
So, you are done with the previous step as well. Now it’s time to guitar string tuning.
I strongly recommend purchasing an electric tuner since it is critical to hear what the guitar should sound like when learning, and electric tuners are rather inexpensive these days.
You will find a ton of fine tuners in the market. The TC Electronic PolyTune Clip or the D’Addario NS Micro Tuner are also excellent choices.
Stretching-in the Strings
This step is quite often forgotten but it’s so important to stretch in the newly set strings.
Simply pull lightly on the string with your right hand while holding the string in place in the nut with your left. You should notice it become significantly out of tune, and you will need to tune it again.
Continue stretching until you no longer need to tune it up – likely to take 4-5 cycles of tune and stretch.
Step 5: Finishing
To finish off you can use wire cutters to snip the extra string at the ends of each one.
If you’re confused about how much string you’ll need, just allow an extra one or two inches. You can always tune your electric guitar further if you want to.
You can take pliers and bend the end of the string 90˚ so you don’t accidentally stab yourself or other people.
And you’re now all good!
How Often Should You Change the Strings?
The frequency with which guitar strings should be replaced is rather subjective; nonetheless, it ultimately depends on the sounds you wish to generate and how frequently you play that guitar.
If you merely want to extend the time between restringing your strings, consider washing them off with a fretboard-safe string cleanser.
A studio guitar that is only ever played softly with a pick could last a few sessions before needing to be restrung. At the same time, moisture and oils from your hands could compromise that “brand-new” feel and tone even after playing a few times.
Meanwhile, touring guitarists might change their strings more frequently, even on a daily basis. This is so that the feel and sound remain consistent for each performance.
Frequently Asked Questions
Can You Use Acoustic Strings on Electric Guitar?
Generally, yes, an electric guitar can use acoustic guitar strings, but it is not recommended as it leads to an unbalanced sound. The reason is that the pickups in the nylon string electric guitar work on magnetic output, and steel-string acoustic guitars are not magnetically active.
Do Unused Guitar Strings Expire?
Unlike produce at your local grocer, guitar string gauges do not have specific expiration dates. They are metal, though, and, if subjected to air and moisture, will rust. Most guitar-string manufacturers advise their strings can last several years before opening and use.
Do Old Electric Guitar Strings Sound Bad?
While old guitars improve with age, old strings typically do not. As guitar strings, age, tone, and intonation are negatively affected by a buildup of dirt, sweat, dead skin, and oils found naturally in the fingers. Strings start to sound dull, become difficult to play and are prone to breakage.
Final Words
I hope you already are aware of the fact how important it is to change your guitar strings. If you just leave it unchanged, neither it will sound nice nor are you going to enjoy your electric guitar journey.
So don’t forget to check if your guitar needs new strings or not.
We hope our step-by-step guide on how to change electric guitar strings will make your guitar journey a lot easier.
Happy playing!
